14 SSL/TLS and HTTPS
In Chapter 12, I used the analogy of putting a letter in the mail for sending HTTP traffic over the web. But there’s more to it. HTTP traffic is sent in plaintext, which is really like sending a postcard. Anyone along the way can just look right at what you’re sending. That’s bad.
HTTPS is the digital equivalent of putting your HTTP mail inside an opaque envelope. Using HTTPS is the most basic layer of security on the internet, and you should configure it for anything you’re administering.
In this chapter, you’ll learn the basics of how HTTPS works. In the lab, you’ll configure your site to use HTTPS so that it can be accessed securely.
What HTTPS does
HTTPS is the same as HTTP, but secured with a technology called SSL/TLS (secure sockets layer/transport layer security). A site secured with SSL/TLS is configured to provide an SSL certificate upon demand; the certificate is then used to verify the site’s identity and establish an encrypted session.
These days, TLS is actually what’s in use, but you’ll mostly talk about SSL. That’s because SSL has been around for a long time and people got used to talking about configuring SSL certificates. TLS is configured exactly the same, so most people still talk about SSL when they really mean TLS.
You use HTTPS constantly. Go to a website in your browser and look for a little lock icon near the search bar. That little lock indicates that the domain is secured using HTTPS. If you click on it, you can get more information about the site’s SSL certificate.
If you’re of a certain age, you may recall warnings that you shouldn’t use the WiFi at your neighborhood Starbucks. The issue was twofold.
First, HTTP has no way to verify that the website you think you’re interacting with is, in fact, that website. A bad actor could put up a fake WiFi network that resolves \(\text{bankofamerica.com}\) to a look-alike website that captures your banking login. That’s called a man-in-the-middle attack.
And even if they didn’t use that trick specifically, there were tools to read the unencrypted HTTP traffic going back and forth in what’s called a packet sniffing attack.
In 2015, Google Chrome began the process of marking any site using plain HTTP as insecure, which led to the nearly complete adoption of HTTPS across the internet. Both man-in-the-middle and packet sniffing attacks have been neutered. It’s now safe to use any random WiFi network you want because of HTTPS.
As a website administrator, securing your website or server with HTTPS is one of the most basic things you can do to ensure your website traffic is safe. You should always configure HTTPS for a public website – full stop.
This SSL/TLS security can be applied to different application layer protocols, including (S)FTP and LDAP(S). You may run across these depending on your organization. In any case, the SSL/TLS part works the same – all that changes is what’s inside the secure digital envelope.
How SSL/TLS works
SSL/TLS uses public key encryption (remember, we learned about that in Chapter 8) to do two things: validate that the site you’re visiting is the site you intend and encrypt the traffic back and forth to the site.
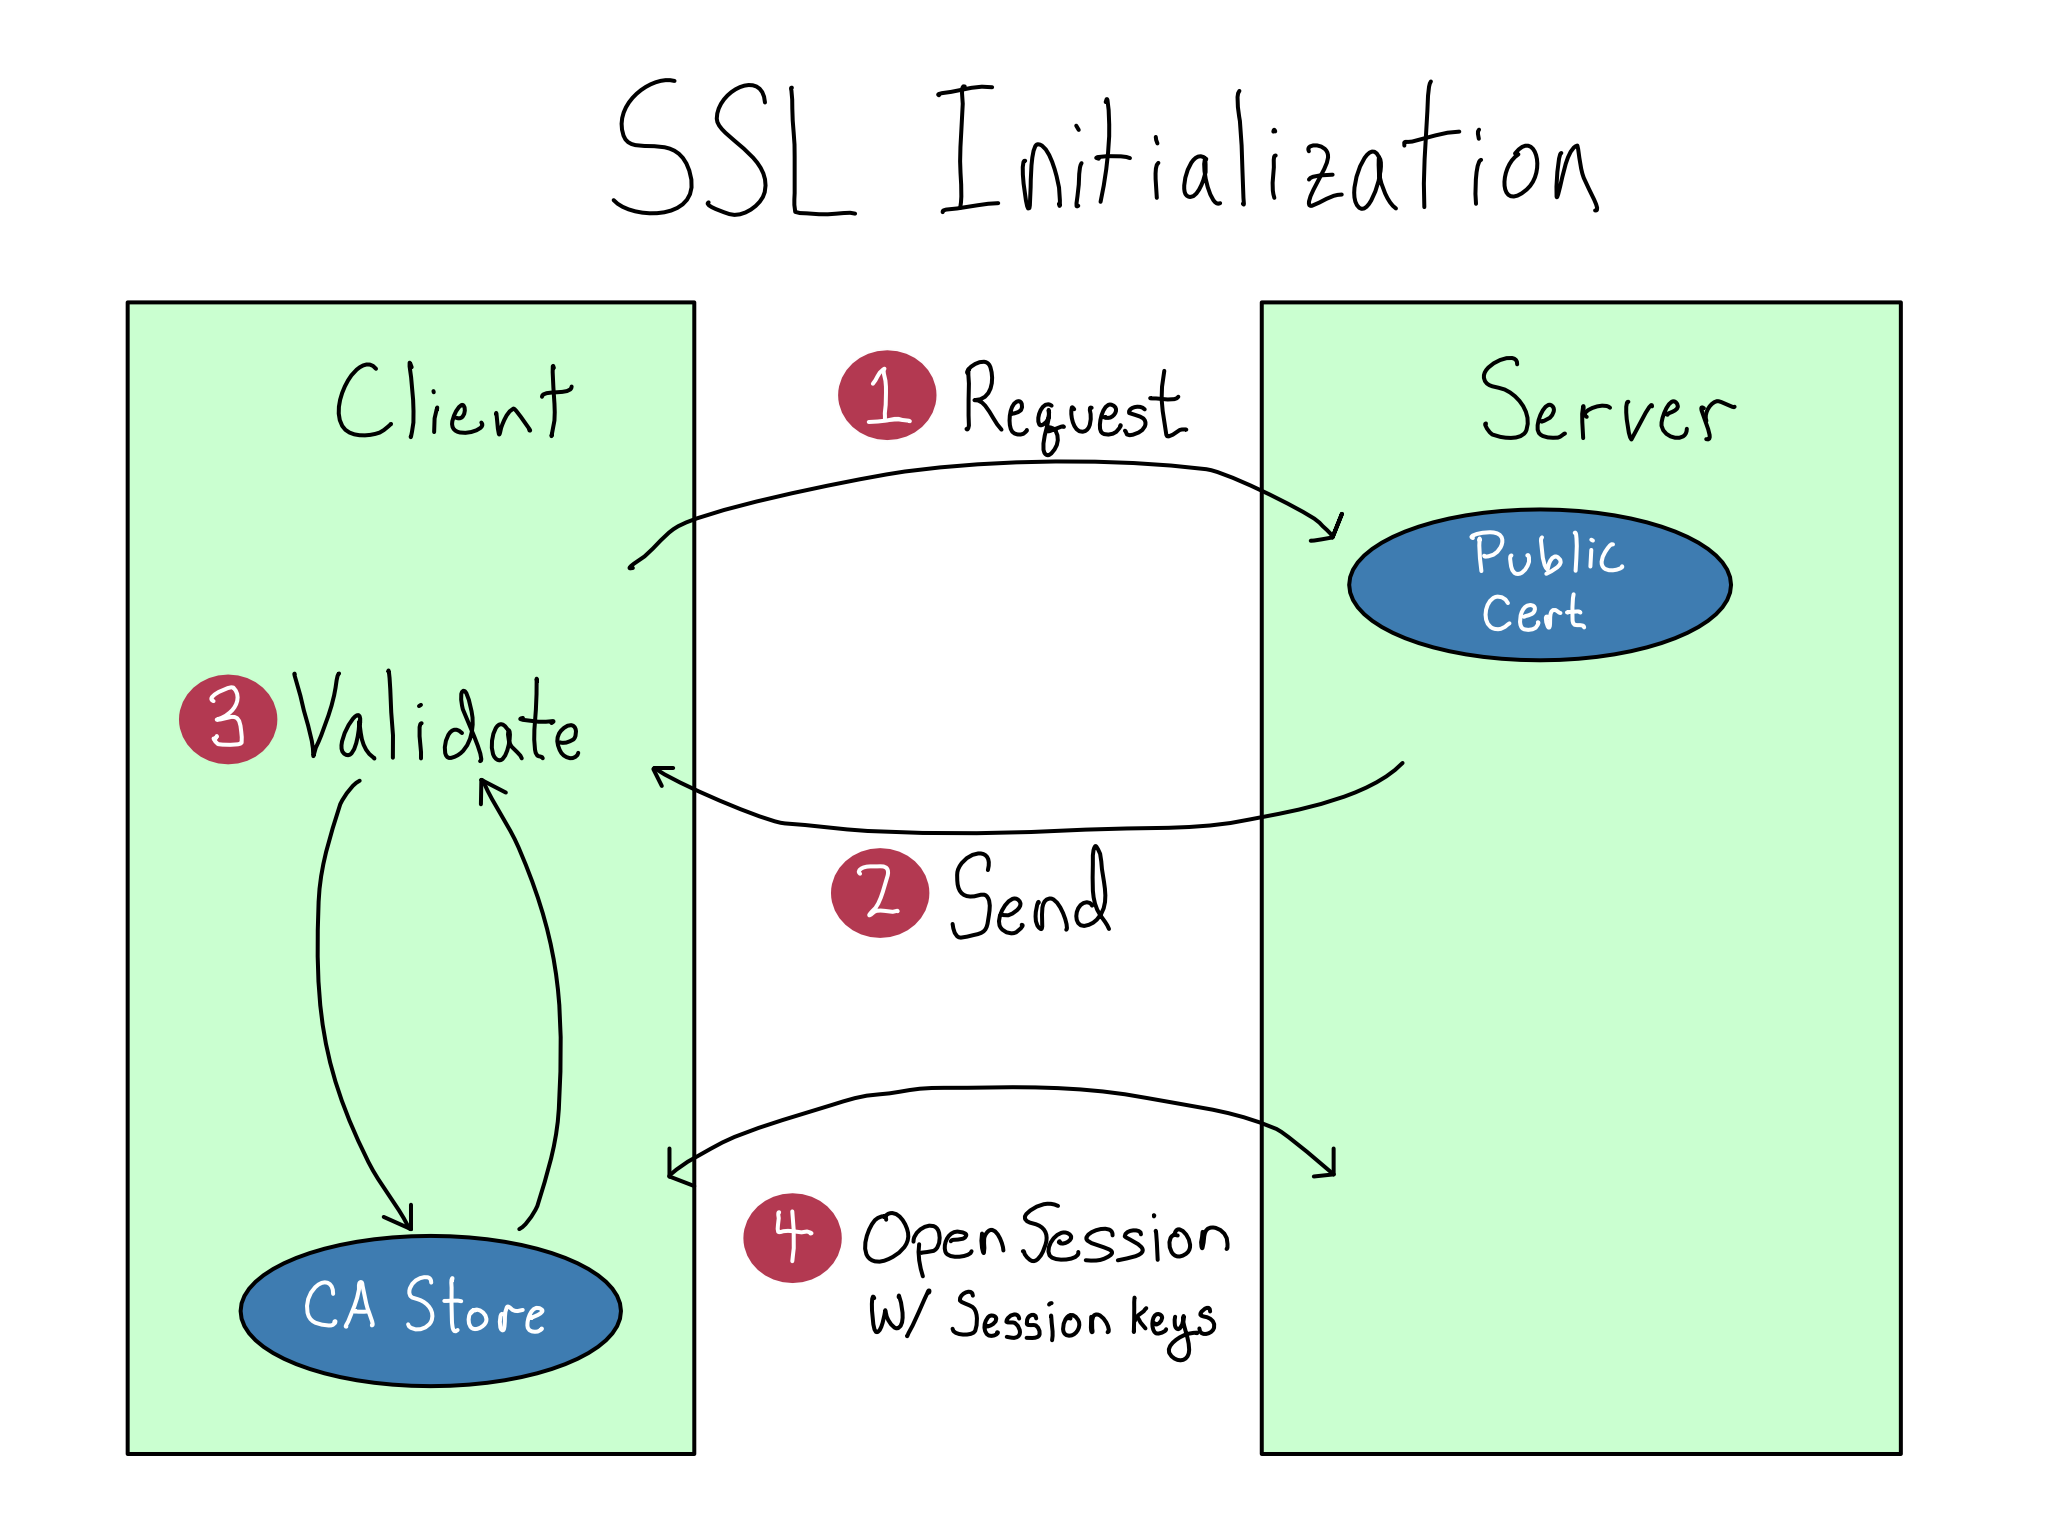
To set up SSL for a website, you create or acquire an SSL certificate, which has a public and a private component (sound familiar?).1 Then, verify the public certificate with a trusted Certificate Authority (CA) and put the private certificate in the right place on the website.
When you go to access that resource, your machine asks for a signature. The service uses its private key to generate a signature and your machine verifies the signature against its internal trusted CA store.2 Now your machine knows it’s communicating with the right host on the other side, and you’re not falling victim to a man-in-the-middle attack.
Once the verification process is done, your machine and the remote on the other side create temporary session keys to establish encryption with the website on the other end.3 Only then does it start sending real data, now encrypted securely inside a digital envelope.
Getting and using SSL certificates
When you buy a computer, it comes configured out of the box to trust a small number of official CAs. If you want to get a certificate for a website, it’s easiest to get it from one of those CAs.
In the past, this process was painful. The CAs charged to issue certificates. While it was only $10 per year for a basic SSL certificate, they typically would only cover a single subdomain. A wildcard certificate to cover all the subdomains of a root domain was expensive enough to discourage hobbyists.
If you wanted a free certificate, your only option was to use a self-signed certificate. Creating a self-signed certificate is as easy as creating an SSH key. But using a self-signed certificate is a pain because you have to manually add the public certificate to the CA store of every machine that accesses the site, and then re-add it when the certificate expires.4
Luckily there’s now another option. For most small organizations or hobbyists, I recommend getting a free SSL certificate from the nonprofit CA Let’s Encrypt. They even have some nice tooling that makes it easy to create and configure your certificate on your server.
Most organizations use a public CA for SSL on public-facing resources and use plain HTTP with no SSL/TLS inside their private networks. Some large organizations want to encrypt their private traffic as well and run their own private CA. If this is the case, your organization’s policies will make it clear. This can be a pain point, because you’ve got to make sure every host inside the network trusts the private CA.
Once you’ve configured SSL/TLS, you generally want to only allow HTTPS traffic to your site. You’ll accomplish this by redirecting all HTTP traffic on port \(80\) to come in via HTTPS on port \(443\).
Some web applications support configuring a certificate directly, while others only accept HTTP traffic, meaning you’d need to do SSL termination with a proxy in front of the application.
Comprehension questions
- What are the two risks of using plain HTTP, and how does HTTPS mitigate them?
- Write down a mental map of how SSL secures your web traffic. Include the following: public certificate, private certificate, certificate authority, encrypted traffic, port 80, port 443.
Lab: Configure SSL
We’re going to use Let’s Encrypt’s certbot utility to automatically generate an SSL certificate, share it with the CA, install it on the server, and even update the NGINX configuration.
If you’ve never had to manually configure SSL in the past, let me tell you, this is magical!
Step 1: Follow instructions to add SSL for NGINX
Using Let’s Encrypt to add an SSL certificate to NGINX configuration is a very common task. As of this writing, there’s a great blog post entitled Using Free Let’s Encrypt SSL/TLS Certificates with NGINX. I’d encourage you to look for that article (or something similar) and follow the steps there.
At a high level, what you’ll do the following:
- Configure the NGINX configuration to know what domain it’s on.
- Install certbot on the system.
- Run certbot to get the certificate, apply it to the server, and update the NGINX configuration.
Before you move along, I’d recommend you take a moment and inspect the /etc/nginx/nginx.conf file to see what certbot added.
Relative to the old version, you’ll notice two things. First, the line that read listen 80 is gone from the server block because we no longer listen for HTTP traffic. In its place, there’s now a listen 443 along with lines that tell NGINX where to find the certificate on the server.
Scrolling down a little, there’s a new server block that is listening on \(80\). This block returns a 301 status code (permanent redirect) and sends traffic to HTTPS on \(443\).
Step 2: Let RStudio Server know it’s on HTTPS
Before we exit and test it out, let’s do one more thing. As mentioned when we configured NGINX the first time, RStudio Server does a bunch of proxying traffic back to itself, so it needs to know that it’s on HTTPS.
You can add a header to all traffic letting RStudio Server know the protocol is HTTPS by adding this line to your nginx.conf:
/etc/nginx/nginx.conf
proxy_set_header X-Forwarded-Proto https;Ok, now try to visit RStudio Server at your URL and you’ll find that…it’s broken again.
Before you read along, think for just a moment. Why is it broken?
Step 3: Configure security groups
If your thoughts went to something involving ports and AWS security groups, you’re right!
By default, our server was open to SSH traffic on port \(22\). Since then, we may have opened or closed port \(80\), \(8000\), \(8080\), \(8787\), and/or \(3838\).
But now the proxy is exclusively receiving HTTPS traffic on \(443\) and redirecting or refusing all other traffic. You have to adjust the security group so there are only two rules – one that allows SSH traffic on \(22\) and one that allows HTTPS traffic on \(443\).
It’s up to you whether you want to leave port \(80\) open. If you do, it will redirect people to HTTPS on \(443\). If you close it entirely, people who come to port \(80\) will be blocked and will eventually get a timeout. If people are already coming to the server via HTTP, it might be nice to leave \(80\) open so they get a smooth redirect experience instead of getting confusingly blocked.
Step 4: We did it!
This is the end of the labs in this book.
At this point, your server is fully configured. You have three real data science services available on a server at a domain of your choosing, all protected by HTTPS.
Take a moment to celebrate. It’s very cool to be able to stand up and administer your own data science workbench. Whether you’re working at a small organization or you’re a hobbyist, you can really use this server to do real data science work.
However, this server isn’t enterprise-ready. If you work at a large organization or one with stringent security or privacy rules, your IT/Admin group is going to have concerns. The final section of the book will introduce you to the (valid) reasons why your organization may not be happy with the data science workbench you’ve configured.
Like with SSH, this makes more sense if you think “key” where you see private, and “lock” where you see public.↩︎
Your machine doesn’t actually keep information on individual websites. Instead, it keeps public certificates for CAs. The CA verifies the certificate for an individual website with a signature signing it. When your machine gets an SSL certificate for an individual website, it can validate that the CA actually endorses this certificate as valid.↩︎
Unlike the asymmetric encryption used by SSL and SSH for the public key encryption, the session keys are symmetric, so they work the same in both directions.↩︎
You also could skip that step, in which case you get the session encryption benefits of SSL/TLS, but not the verification.↩︎