5 Deployments and Code Promotion
Your work doesn’t matter if it never leaves your computer. You want your work to be useful, and it only becomes useful if you share it with the people and systems that matter. That requires putting it into production.
When it goes well, putting code into production is a low-drama affair. When it goes poorly, putting code into production is a time-consuming ordeal. That’s why putting code into production – deployment – is one of the primary concerns of DevOps best practices.
The DevOps way to deploy code is called CI/CD, which is short for Continuous Integration and Continuous Deployment and Continuous Delivery (yes, the CD stands for two different things). When implemented well, CI/CD eases the deployment process through a combination of good workflows and automation.
A few of the principles of CI/CD workflows include:
- Central availability of source code, almost always in version control, that allows you to build the project from scratch.
- Frequent and incremental additions to the production version of the code.
- Automation for carrying out the actual deployment.
- Automated testing on a pre-deployment version of the code.
In this chapter, you’ll learn how to create a code promotion process to incorporate CI/CD principles and tools into your data science project deployments.
Separate the prod environment
CI/CD is all about quickly promoting code into production. It’s all too easy to mess up production if you don’t have a clear boundary between what is in production and what isn’t. That’s why software environments are often divided into dev, test, and prod.
Dev is the development environment where new work is produced, test is where the code is tested for performance, usability, and feature completeness; and prod is the production environment. Sometimes dev and test are collectively called the lower environments and prod the higher environment.
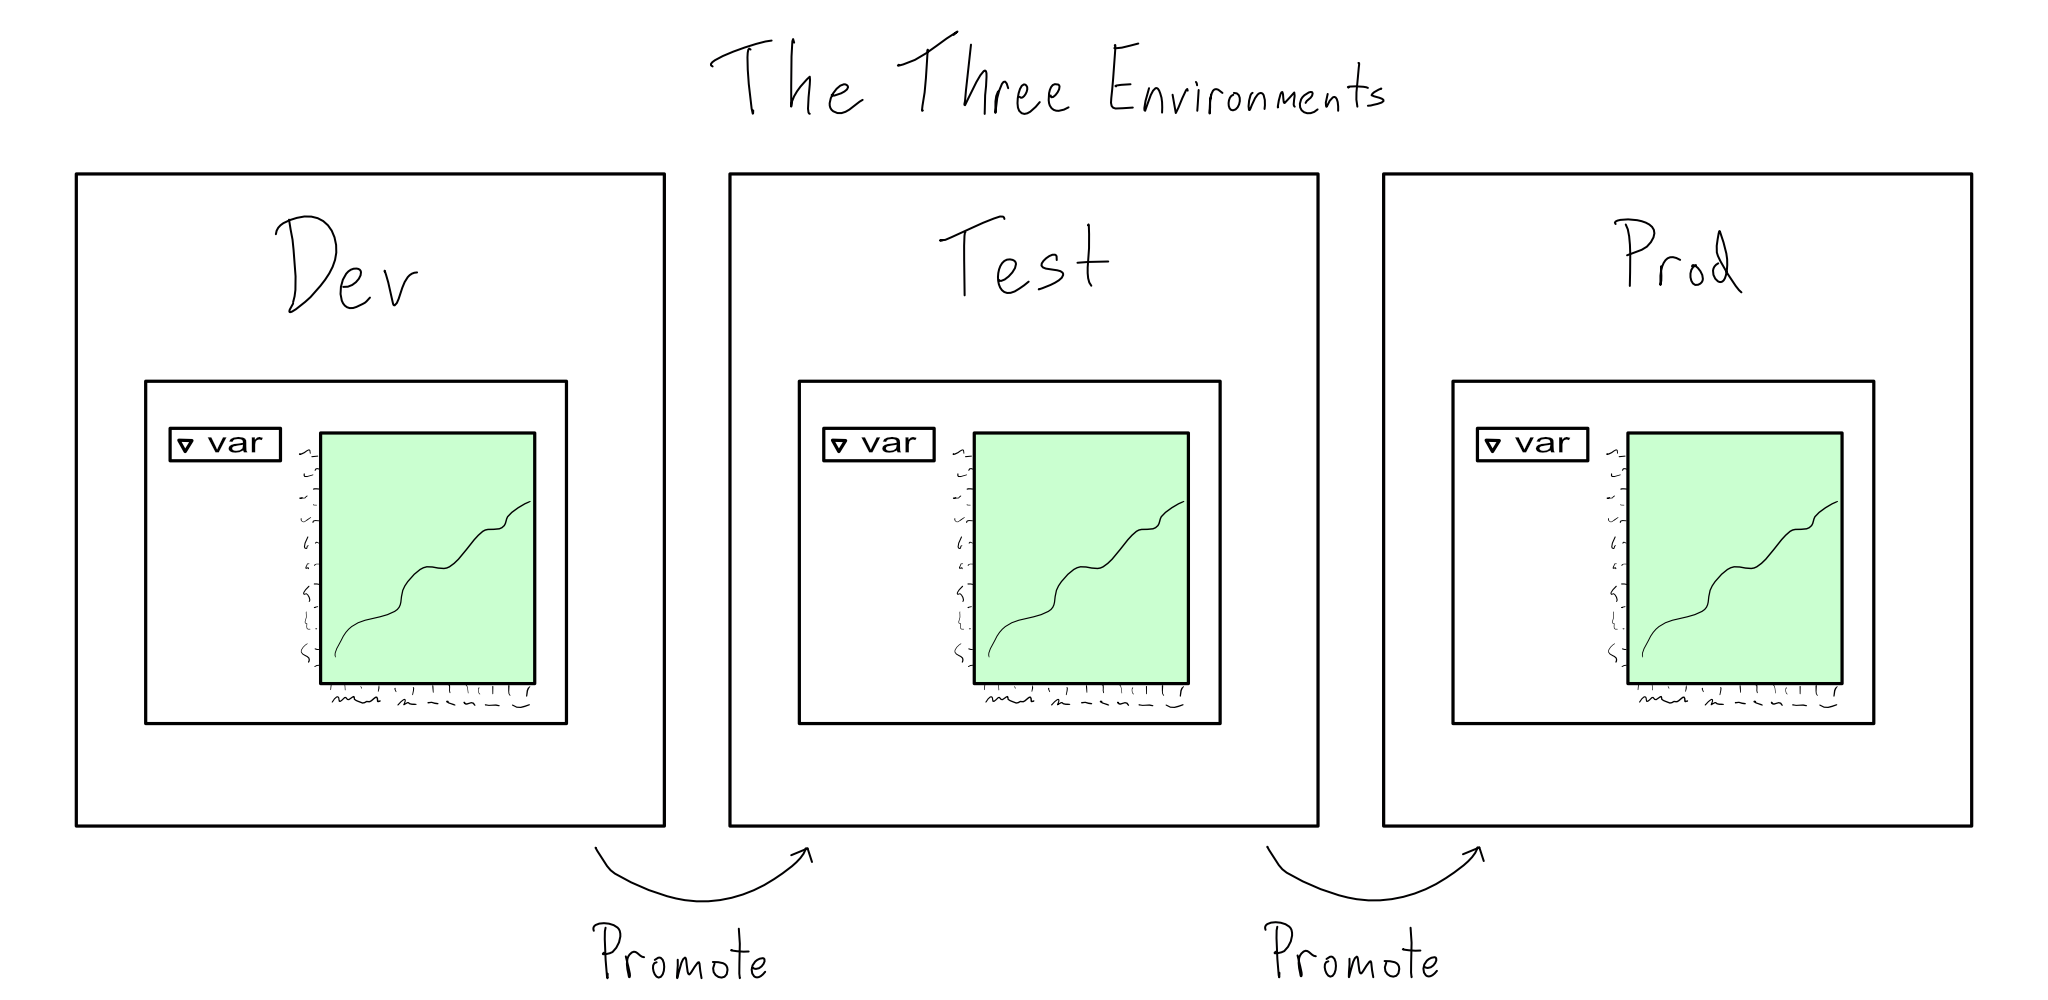
While the dev/test/prod triad is the most traditional, some organizations have more than two lower environments and some have only dev and prod. That’s all fine. The number and configuration of lower environments should vary according to your organization’s needs. But, just as Tolstoy said about happy families, all prod environments are alike.
Some criteria that all good prod environments meet:
The environment is created using code. For data science, that means managing R and Python packages using environments as code tooling, as discussed in Chapter 1.
Changes happen via a promotion process. The process combines human approvals validating code is ready for production with automations to run tests and deploy.
Changes only happen via the promotion process. This means no manual changes to the environment or the active code in production.
Rules 1 and 2 tend to be easy to follow. It might even be fun to figure out how to create the environment with code and design a promotion process. But, the first time something breaks in your prod environment, you will be sorely tempted to violate rule 3. Please don’t do it.
Keeping a pristine prod environment is necessary if you want to run a data science project that becomes critical to your organization. When an issue arises, you must reproduce it in a lower environment before pushing changes through your promotion process. Keeping your environments in sync is crucial to reproduce prod issues in lower environments.
These guidelines for a prod environment look almost identical to guidelines for general-purpose software engineering. The divergent needs of data scientists and general-purpose software engineers show up in the composition of lower environments.
Dev and Test Environments
As a data scientist, dev means working in a lab environment like RStudio, Spyder, VS Code, or PyCharm and experimenting with the data. You’re slicing the data this way or that to see if anything meaningful emerges, creating plots to see if they are the right way to show off a finding, and checking whether certain features improve model performance. All this means it is impossible to work without real data.
“Duh”, you say, “Of course you can’t do data science without real data”.
This may be obvious to you, but needing to do data science on real data in dev is a common source of friction with IT/Admins.
That’s because this need is unique to data scientists. For general-purpose software engineering, a lower environment needs data formatted like the real data, but the content doesn’t matter.
For example, if you’re building an online store, you need dev and test environments where the API calls from the sales system are in the same format as the real data, but you don’t care if it’s real sales data. In fact, you probably want to create some odd-looking cases for testing purposes.
One way to help alleviate concerns about using real data is to create a data science sandbox. A great data science sandbox provides:
Read-only access to real data for experimentation.
Places to write mock data to test things you’ll write for real in prod.
Expanded access to R and Python packages for experiments before promoting to prod.
Working with your IT/Admin team to get these things isn’t always easy. They might not want to give you real data in dev. One point to emphasize is that creating this environment makes things more secure. It gives you a place to do development without fear that you might damage production data or services.
Version control implements code promotion
Once you’ve invented your code promotion process, you need a way to operationalize it. If your process says that your code needs testing and review before it’s pushed to prod, you need a place to do that. Version control is the tool to make your code promotion process real.
Version control is software that allows you to keep the prod version of your code safe, gives contributors a copy to work on, and hosts tools to manage merging changes back together. These days, Git is the industry standard for version control.
Git is an open-source system for tracking changes to computer files in a project-level collection called a repository. You can host repositories on your own Git server, but most organizations host their repositories with free or paid plans from tools like GitHub, GitLab, Bitbucket, or Azure DevOps.
This is not a book on Git. If you’re not comfortable using local and remote repositories, branching, and merging, then the rest of this chapter will not be useful right now. I recommend you take a break from this book and learn about Git.
People who say learning Git is easy are either lying or have forgotten. I am sorry our industry is standardized on a tool with such terrible ergonomics. It is, unfortunately, worth your time to learn.
Whether you’re an R or Python user, I’d recommend starting with a resource designed to teach Git to a data science user. My recommendation is to check out HappyGitWithR by Jenny Bryan.
If you’re a Python user, some specific tooling suggestions won’t apply, but the general principles will be the same.
If you know Git and need a reminder of commands, see Appendix D for a cheat sheet of common ones.
The precise contours of your code promotion process and, therefore, your Git policies – are up to you and your organization’s needs. Do you need multiple rounds of review? Can anyone promote something to prod or just certain people? Is automated testing required?
You should make these decisions as part of your code promotion process, which you can enshrine in the project’s Git repository configuration.
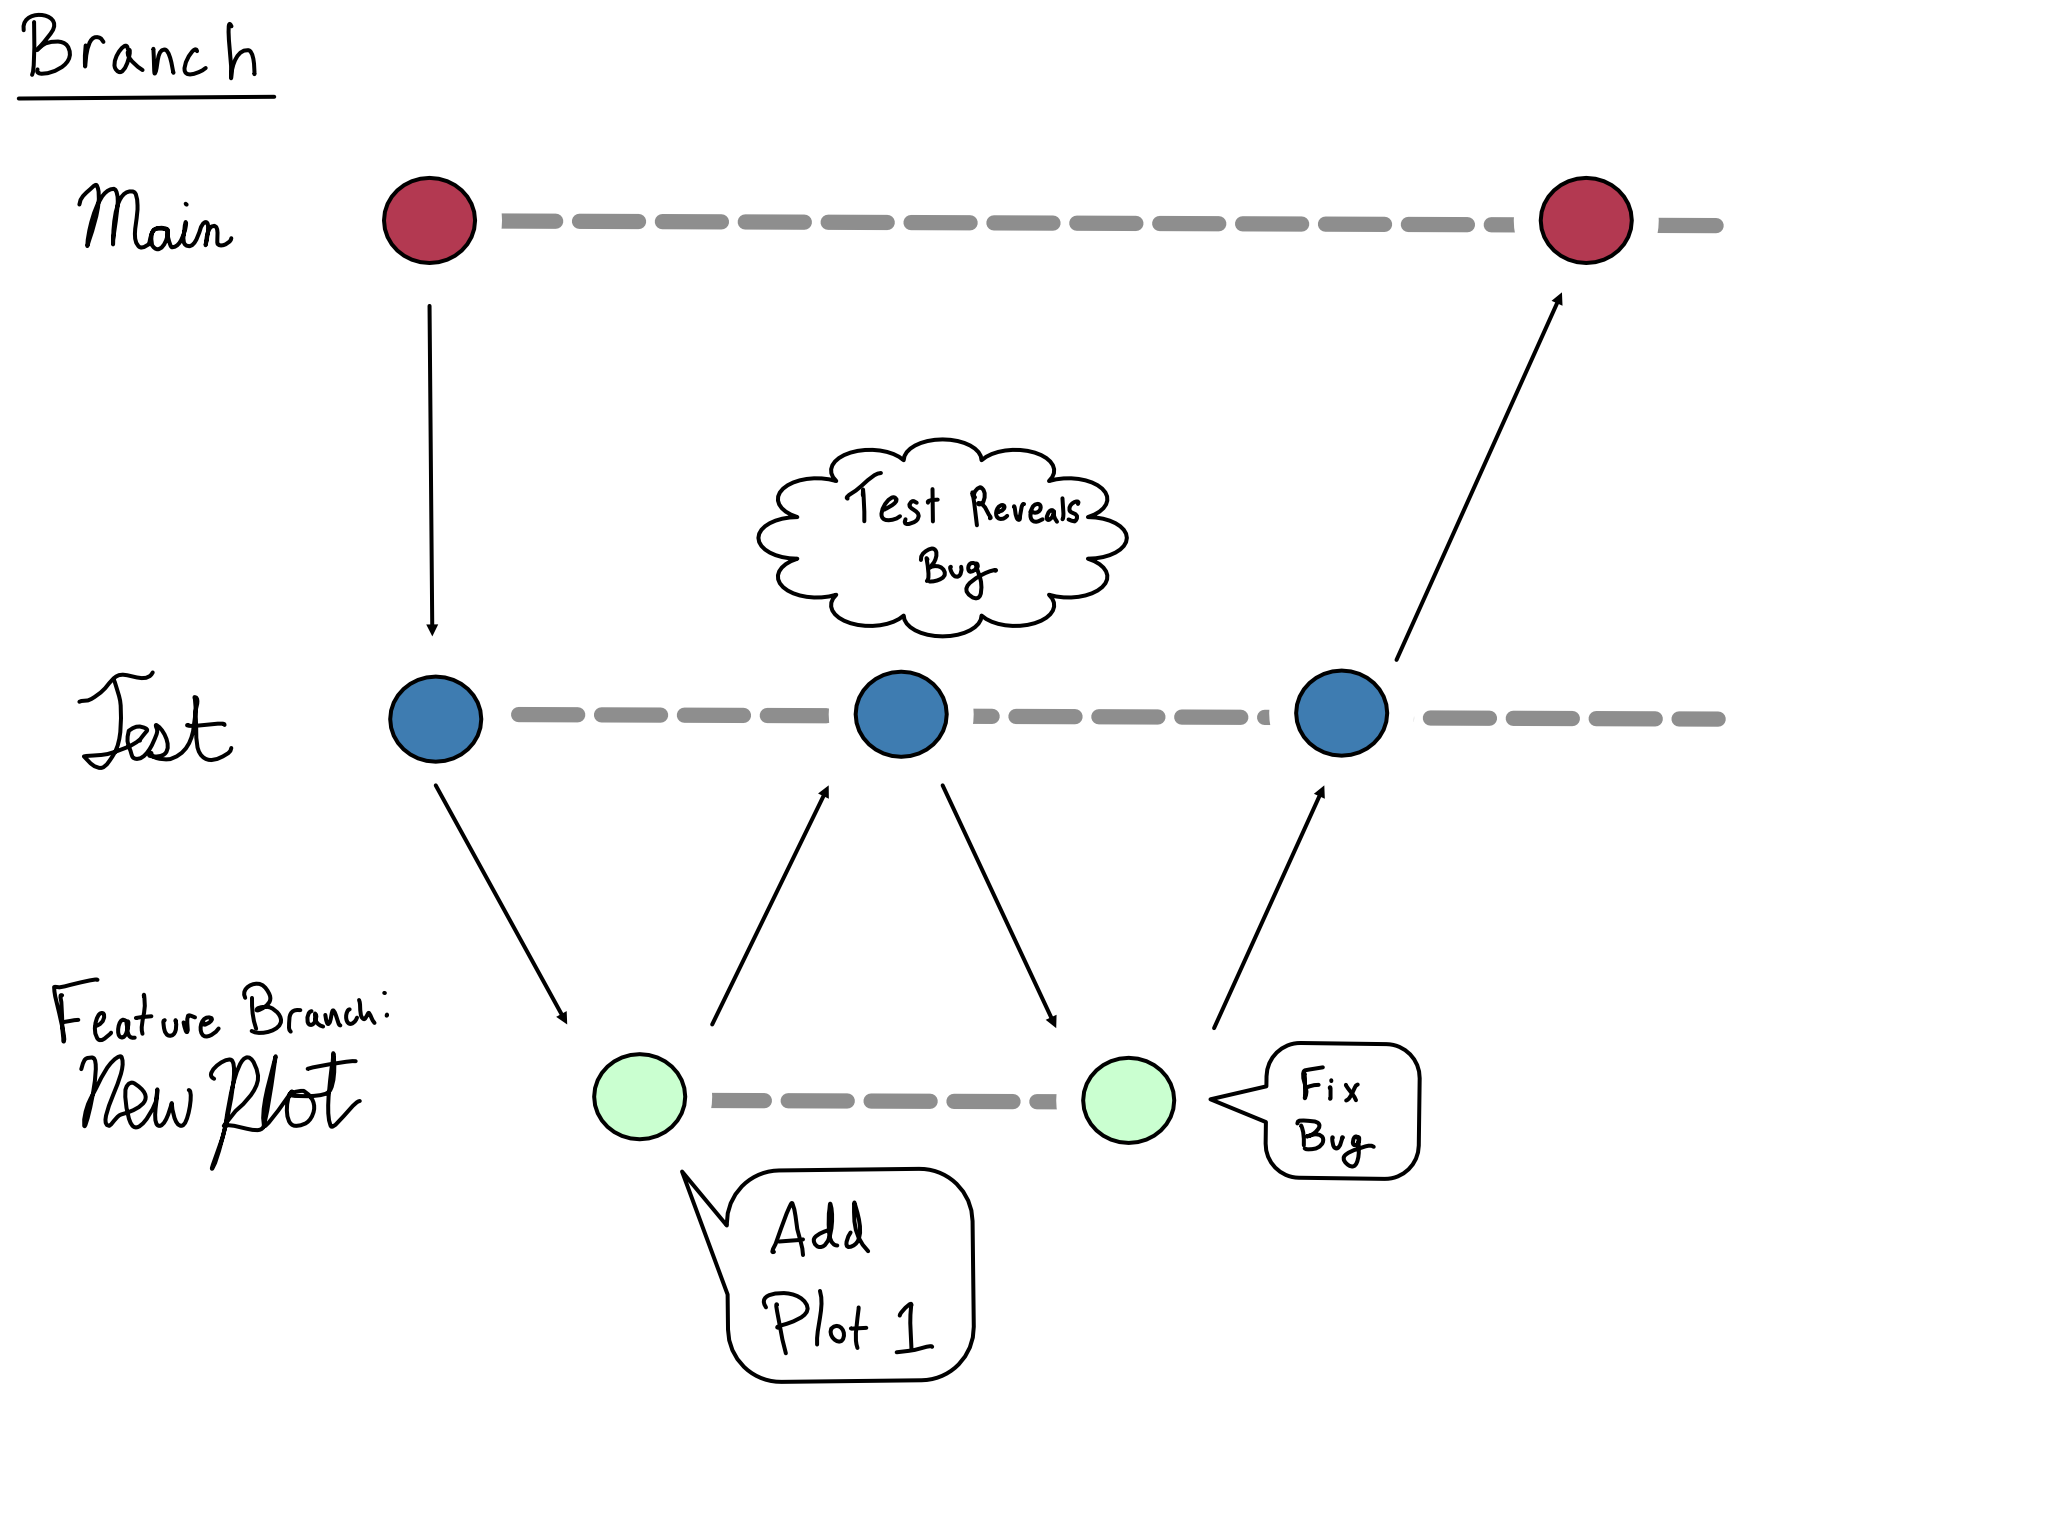
One important decision you’ll make is how to configure the branches of your Git repository. Here’s how I’d suggest you do it for production data science projects:
- Maintain two long-running branches –
mainis the prod version of your project andtestis a long-running pre-prod version. - Code can only be promoted to
mainvia a merge fromtest. Direct pushes tomainare not allowed. - New functionality is developed in short-lived feature branches that are merged into
testwhen you think they’re ready to go. Once sufficient approvals are granted, the feature branch changes intestare merged intomain.
This framework helps maintain a reliable prod version on the main branch while leaving sufficient flexibility to accomplish any set of approvals and testing you might want.
Here’s an example of how this might work. Let’s say you were working on a dashboard and were trying to add a new plot.
You would create a new feature branch with your work, perhaps called new_plot. When you were happy with it, you would merge the feature branch to test. Depending on your organization’s process, you might be able to merge to test yourself or you might require approval.
If your testing turned up a bug, you’d fix the bug in the feature branch, merge the bug fix into test, re-test, and merge to main once you were satisfied.
Here’s what the Git graph for that sequence of events might look like:
One of the tenets of a good CI/CD practice is that changes are merged frequently and incrementally into production.
A good rule of thumb is that you want your merges to be the smallest meaningful change that can be incorporated into main in a standalone way.
There are no hard and fast rules here. Knowing the appropriate scope for a single merge is an art – one that can take years to develop. Your best resource here is more senior team members who’ve already figured it out.
Configuring Per-Environment Behavior
As you promote an app from dev to test and prod, you probably want behavior to look different across the environments. For example, you might want to switch data sources from a dev database to a prod one, switch a read-only app into write mode, or use a different logging level.
The easiest way to create per-environment behavior is to:
- Write code that includes flags that change behavior (e.g., write to the database or not).
- Capture the intended behavior for each environment in a YAML config file.
- Read in the config file as your code starts.
- Choose the values for the current environment based on an environment variable.
Only non-secret configuration settings should go in a config file. Secrets should be injected at runtime from the CI/CD or deployment platform, most often directly into environment variables.
For example, let’s say you have a project that should use a special read-only database in dev and switch to writing in the prod database in prod. You might write the config file below to describe this behavior:
config.yml
dev:
  write: false
  db-path: dev-db
prod:
  write: true
  db-path: prod-db
Then, you’d set that environment variable to have the value dev in dev and prod in prod. Your code would grab the correct set of values based on the environment variable.
In Python there are many different ways to set and read a per-environment configuration. The easiest way to use YAML is to read it in with the {yaml} package and treat it as a dictionary.
In R, the {config} package is the standard way to load a configuration from a YAML file. The config::get() function uses the value of the R_CONFIG_ACTIVE environment variable to choose which configuration to use.
CI/CD automates Git operations
The role of Git is to make your code promotion process happen. Git allows you to configure requirements for whatever approvals and testing you need. Your CI/CD tool sits on top of that so that all this merging and branching does something.1
To be more precise, a CI/CD pipeline for a project watches the Git repository and does something based on a trigger. Common triggers include a push or merge to a particular branch or a pull request opening.
The most common CI/CD operations are pre-merge checks like spell checking, code linting, automated testing, and post-merge deployments.
There are a variety of different CI/CD tools available. Because of the tight linkage between CI/CD operations and Git repos, CI/CD pipelines built into Git providers are very popular.
Quick Intro to GitHub Actions
While there are a number of CI/CD pipeline tools, including Jenkins, Travis, Azure DevOps, and GitLab, GitHub Actions immediately rocketed to number one when it was released a few years ago. At this point, many organizations are quickly moving their CI/CD into GitHub Actions if they haven’t already done so.
GitHub Actions are defined in .yml files that go in the .github/workflows directory of a project. GitHub knows to inspect that directory and kick off any prescribed actions when there are changes to the repo. Let’s talk about some of the basics of understanding and using GitHub Actions.
Actions occur in response to specific triggers. A trigger consists of the specific Git operations that run the action as well as which branches are being watched. In GitHub Actions, the on section defines when the workflow runs. A basic one might look something like this:
- 1
-
This Action runs on a
push, which includes s completed merge. - 2
-
This Action runs based on operations on the
mainbranch.
Other common patterns include pre-merge checks that trigger on the creation of a pull request or a test deployment on a push to a test branch.
Once the job has been triggered, it kicks off a runner, which is the virtual machine where the job runs. The jobs section of a GitHub Action defines the runner.
- 1
-
The name of this job is
deploy. There can be multiple jobs per action. - 2
- This job runs on the latest Ubuntu release.
GitHub Actions offers runners with Ubuntu, Windows, and MacOS. You can also add custom runners. Depending on the level of reproducibility you’re aiming for, you might want to lock the runner to a particular version of the operating system rather than just running latest.
Once the job is kicked off and the runner is live, it’s time to actually do something. Because the default runners are all basically bare operating systems, the action needs to include steps to build the environment before you can actually run any code. Depending on what you’re doing, that will mean installing OS dependencies, installing Python and/or R, and installing R and Python packages for whatever content you’re running.
In GitHub Actions, the jobs section defines the set of steps that comprise the action. Most steps use the uses command to run an action that someone else wrote. Some actions accept variables with the with command. In order to ensure that your Actions can remain flexible and your secrets secret, GitHub Actions allows you to pull a value from the GitHub GUI and use it in a step with the ${{ <variable > }} syntax.
For example, here’s a made up action to publish to a server with a URL and API Key:
.github/workflows/publish.yml
- 1
-
This job uses version 2 (
@v2) of thepublishaction from the (imaginary) GitHub reposerver-dev/server-actions. - 2
-
This job is being provided a value of
my-serverfor theserver-namevariable. - 3
-
The variable
SERVER_API_KEYwill be set to the value stored in the GitHub Actionssecretsvariable calledSERVER_API_KEY.
Some jobs require secrets be in an environment variable, which can be set just like a regular variable, but with env in place of with.
If you want to do something that doesn’t have a preexisting action, you can use a run step to run a command as if at a terminal on the runner, like this:
.github/workflows/publish.yml
- name: Install Python and Dependencies
  uses: actions/setup-python@v4 # <1>
  with:
    python-version: '3.10'
    cache: 'pip'
- run: pip install -r requirements.txt # <2>- This line uses the
usessyntax with thesetup-pythonaction. - This line uses the
runcommand to just run the line.
Comprehension questions
- Write down a mental map of the relationship between the three environments for data science. Include the following terms: Git Promote, CI/CD, automation, deployment, dev, test, prod.
- Why is Git so important to a good code promotion strategy? Can you have a code promotion strategy without Git
- What is the relationship between Git and CI/CD? What’s the benefit of using Git and CI/CD together?
- Write out a mental map of the relationship of the following terms: Git GitHub, CI/CD, GitHub Actions, Version Control.
Lab: Host a website with automatic updates
In labs 1 through 4, you’ve created a Quarto website for the penguin model. You’ve got sections on EDA and model building. But it’s still just on your computer.
In this lab, we will deploy that website to a public site on GitHub and set up GitHub Actions as CI/CD so the EDA and modeling steps re-render every time we make changes.
If you would like to see an example of working GitHub Action script, you can find mine in the GitHub repo for this book (akgold/do4ds) in the _labs/lab5 directory.
You can also check out the GitHub Actions used to publish this book in the _github directory of the GitHub repo.
Before we get into the meat of the lab, there are a few things you need to do on your own. If you don’t know how, there are plenty of great tutorials online.
- Create an empty public repo on GitHub.
- Configure the repo as the remote for your Quarto project directory.
Once you’ve connected the GitHub repo to your project, you will set up the Quarto project to publish via GitHub Actions. There are great directions on configuring that on the Quarto website.
If you read the Quarto documentation, they recommend freezing your computations. Freezing is useful if you want to render your R or Python code only once and update only the text of your document.
That said, freezing isn’t an option if you intend the CI/CD environment to re-run the R or Python code. Because the main point here is to learn about getting environments as code working in CI/CD, you should not freeze your environment.
Following those instructions will accomplish three things for you:
- Generate a
_publish.yml, which is a Quarto-specific file for configuring publishing locations. - Configure GitHub Pages to serve your website off a long-running standalone branch called
gh-pages. - Generate a GitHub Actions workflow file, which will live at
.github/workflows/publish.yml.
In order to properly render your website, you will need to have Python and R installed in the environment with the proper packages. That means before your action can run in GitHub Actions, you’ll need to add steps to:
- Install Python, install
jupyter, and run apip installagainst therequirements.txt. - Install R, install
{renv}, and run anrenv::restore().
CRAN doesn’t serve binary packages for Linux, which means your package installs will be slow if you stick with the default repositories. Public Posit Package Manager does have Linux binaries.
You can set up {renv} with the the r-lib/actions/setup-renv action and direct direct {renv} to install from Public Posit Package Manager by setting the RENV_CONFIG_REPOS_OVERRIDE environment variable to be the URL of a Posit Package Manager repository, like \(\text{https://packagemanager.posit.co/all/latest}\).
Once you’ve made those changes, try pushing or merging your project to main. If you click on the Actions tab on GitHub you’ll be able to see the Action running.
In all honesty, it will probably fail the first time or five. You will rarely get your Actions correct on the first try. Breathe deeply and know we’ve all been there. You’ll figure it out.
Once it’s up, your website will be available at \(\text{https://<username>.github.io/<repo-name>}\).
Strictly speaking, this is not true. There are a lot of different ways to kick off CI/CD jobs. But, the right way to do it is to base it on Git operations.↩︎