12 Computer Networks
If a server is running but no one has access, is it really there? AWS would say yes, and they will still bill you. But that server won’t be much use to you.
Once you’ve got a server up and running with the applications you want, you need to make it accessible to the people who need it. That’s why computer networking, which is how computers send information back and forth, is the second big component of administering a server.
Digital messages (network traffic) always exist on a call-and-response model. When your computer does something over a network, like open a website, print something, or call an API, it sends network traffic and waits for a response. That traffic is addressed to a particular location and a particular service, which is the program that will do something with that incoming traffic.
To understand how this all works, let’s think about the mail, i.e., the physical kind that goes in an envelope and is delivered in trucks. I imagine our server as an apartment building. Each service lives in one apartment and is waiting for incoming mail. As the server admin, we are responsible for properly configuring networking so the mail can find its way to the proper building and the proper apartment.
In computer networking, the routing process is defined by a set of rules called TCP/IP (Transmission Control Protocol/Internet Protocol) that define everything from the digital equivalent of valid envelope sizes to how to load and unload virtual mail trucks.
In this chapter, you’ll learn the basics of TCP/IP, how one computer successfully sends a message to another, and how that applies to your attempts to manage a data science workbench. In the lab, you’ll make your data science workbench available on the internet.
Understanding digital addresses
You already use digital addresses all the time in the form of a URL (Uniform Resource Locator).1 A URL has four parts that fully specify the network location of a resource.2 A full URL looks like this:
\[\overbrace{\text{https://}}^\text{protocol}\underbrace{\text{google.com}}_\text{domain}\overbrace{\text{:443}}^\text{port}\underbrace{\text{/}}_\text{path}\]
Here’s what each of those four parts are:
The application layer protocol (often just called the protocol) specifies what type of traffic this is. It’s like agreeing that your letter will be in English or Arabic or Dutch.
The domain is a human-readable way of providing the digital street address of the server.
The port specifies where on the server to direct the traffic. It’s the digital equivalent of the apartment number.
The path is a human-friendly way of specifying who you intend the message to go to. It’s like the addressee’s name on your letter.
This may look a little strange. You’re probably accustomed to using just the domain and possibly a path in your web browser like \(\text{google.com}\) or \(\text{google.com/maps}\). The reason is that you’re usually fine with the default protocol and port, so you may never have realized they exist.
Network traffic and IP addresses
A domain is the human-readable way of addressing a resource on the internet. But it’s not actually a digital street address. Instead, server (host) locations are identified with an IP Address. When that IP address is valid across the entire internet, it’s a public IP address. Otherwise, it’s private.
When your computer needs to send a message, it turns that message into one or more packets, addresses them to a target IP Address, and sends them off. Then a system of hardware and software tools called routers is responsible for getting the packets to the right place in a process called packet switching.3 Packet switching is the digital equivalent of getting the mail to the right building.
Your computer gets the right IP Address from the domain using the DNS (Domain Name Service), which you’ll learn about in Chapter 13.
If you’ve seen an IP Address before, it probably was an IPv4 address. These are four blocks of 8-bit fields (numbers between \(0\) and \(255\)) with dots in between, so they look like \(64.56.223.5\).
If you do the math, you’ll realize there are “only” about 4 billion of these. There are so many things on the public internet that we are running out of IPv4 addresses. The good news is that smart people started planning for this a while ago and the adoption of the new IPv6 standard started a few years ago.
IPv6 addresses are eight blocks of hexadecimal (\(\text{0--9}\) and \(\text{a--f}\)) digits separated by colons with certain rules that allow them to be shortened, so \(\text{4b01:0db8:85a3:0000:0000:8a2e:0370:7334}\) or \(\text{3da4:66a::1}\) are both examples of valid IPv6 addresses. There’s no worry about running out of IPv6 addresses any time soon, because the total quantity of IPv6 addresses is a number with 39 zeroes.
IPv6 will coexist with IPv4 for a few decades; at some point, we’ll switch entirely to IPv6.
There are a few special IPv4 addresses worth knowing. You’ll probably see \(127.0.0.1\) a lot, which is also known as \(\text{localhost}\) or loopback; \(\text{localhost}\) is how a machine sends traffic back to itself, which happens more often than you may realize.
For example, if you open a Shiny app in RStudio Desktop, the app will pop up in a little window along with a notice that says:
Terminal
Listening on http://127.0.0.1:6311That means that the Shiny app is running on the same computer and is available on port \(6311\). You can open that location in your browser to view the app as it runs.
There are also a few blocks of IPv4 addresses that are reserved for use in private networks. Addresses that start with \(192.168\), \(172.16\), and \(10\) are used exclusively in private networks. All private networks should use these addresses, and you’ll never see them in public.
Services and ports
Once the traffic arrives at the server, it must find the right service at the right port. This is the digital equivalent of putting the mail in the right mailbox in the building’s mail room.
Every port is uniquely identified by a number. There are over 65,000 ports on every computer. Since you’re probably running no more than a handful of services, the overwhelming majority of the ports are closed at any given time.4
As an admin, one of your primary responsibilities is to make sure that incoming traffic gets to the right port for the intended service.
If you’ve got just one service, you will probably just move the service to run where the traffic is going anyway. By default, HTTP traffic goes to port \(80\) and HTTPS goes to port \(443\). So you would configure the application to listen on port \(80\) and/or \(443\) so incoming web traffic would automatically get to the right service.
But sometimes you’ve got multiple services on the server. Since there’s a 1-1 mapping for ports and services, you can’t run multiple services on the same port and you don’t want users to have to remember non-standard ports. In that case, you run each service on a unique port and make the traffic go to that port.
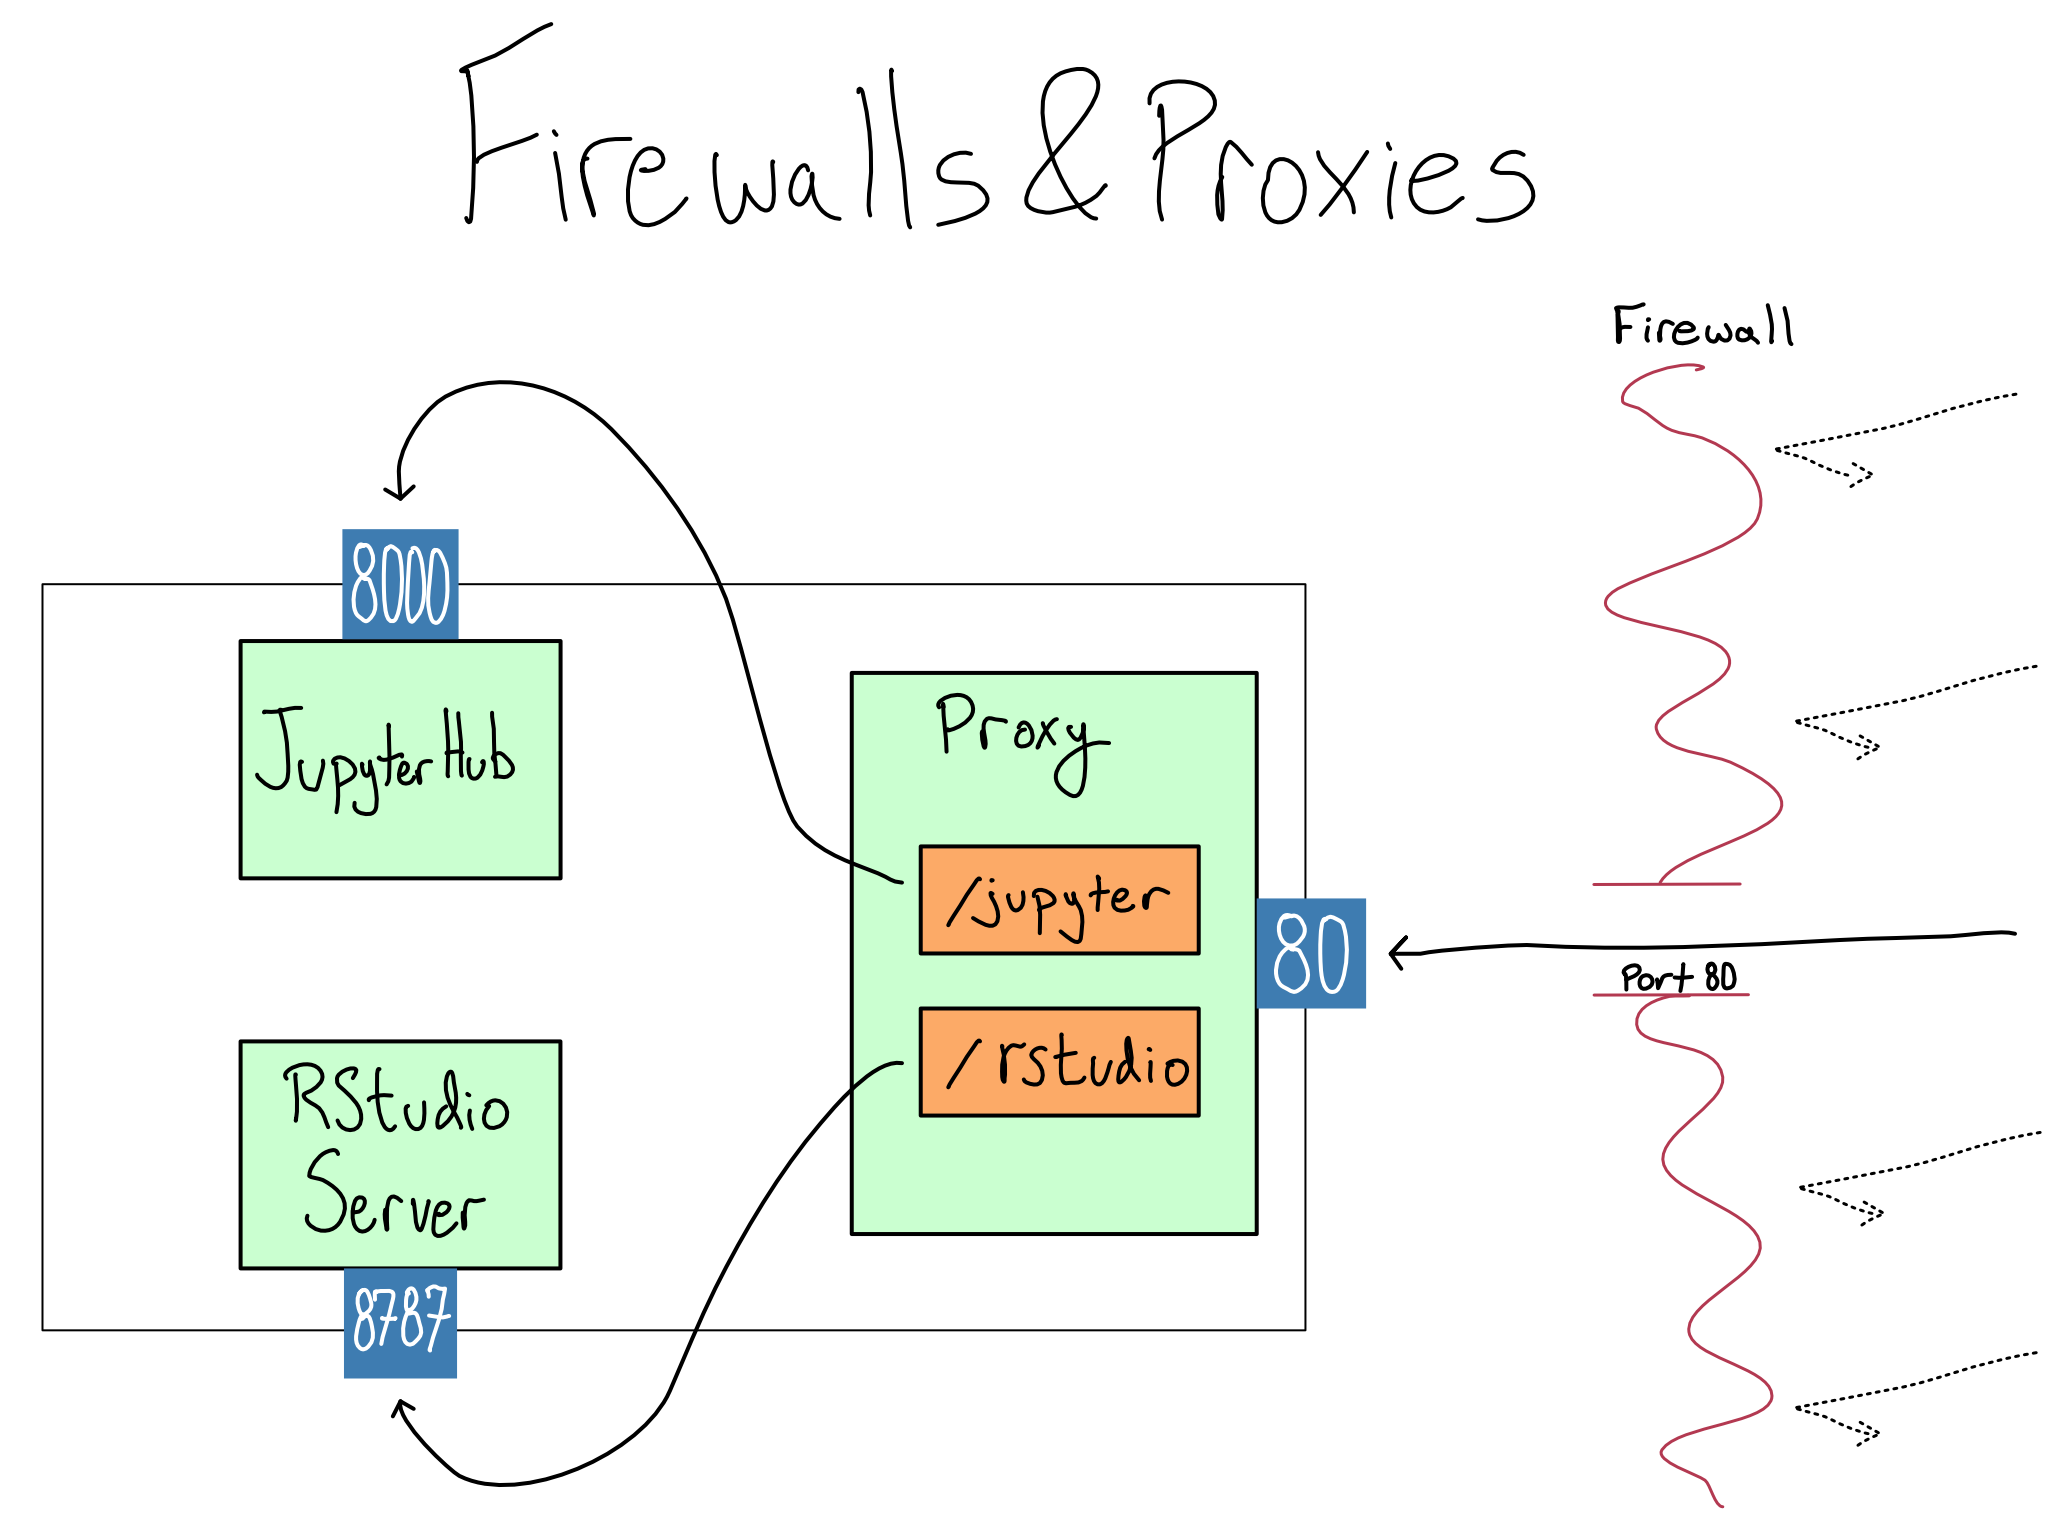
For example, maybe you have RStudio and JupyterHub running on the same server. If you run them on their default ports, RStudio will be on port \(8787\) and JupyterHub will be on \(8000\).5 Somehow you’ve got to smoothly redirect user traffic, which comes in on \(80\) or \(443\), to those other ports. The most common configuration is to use a piece of technology called a proxy to put each service on a path. For example, you might configure the path \(\text{/rstudio}\) to go to port \(8787\) on the server and the \(\text{/jupyter}\) path to go to \(8000\).
There are free and open-source proxies, like NGINX and Apache. There are also paid proxies like Citrix, Fortinet, Cloudflare, and F5 (they maintain NGINX). Depending on the configuration, the proxy can be on the same server as your services or a different one.
In many cases, including using an EC2 instance, simply opening port \(80\) or \(443\) on the server or proxy still won’t allow you to access the server from the web. That’s because there’s a firewall sitting in front of the server which blocks traffic to all but certain ports. Before accessing anything on the server, you’ll need to configure the firewall to allow traffic on port \(80\) or \(443\).
In addition to blocking traffic to arrive at certain ports, firewalls can be restricted to allow access only from certain IP Addresses. This can be used, for example, to only allow access from your office to a server. Unless a particular server will only ever be accessed by other servers with known IP addresses, this is a brittle way to configure security, and I generally don’t recommend it.
In AWS, the default firewall is called the security group. The default security group accepts traffic only on port \(22\), which is the default for ssh. If you think you’ve configured a service correctly and you just can’t seem to access it, one of the first things to check is whether you’ve got the port open in the security group.
One symptom indicating a possible security group issue is if you try to go to your service and it hangs with no response before eventually timing out.
We’ve been talking exclusively about HTTP and HTTPS traffic arriving on \(80\) and \(443\), because web traffic arrives as a series of HTTP GET requests; there are many other application layer protocols, each with its own default port.
For example, in this book, you’ve already seen a lot about SSH which is an application layer protocol for allowing secure login and communication over an unsecured network. SSH defaults to port \(22\). Some protocols piggyback on others. For example, SFTP for file transfers secured with SSH also use \(22\), and websockets, which are used by Shiny and Streamlit, use standard HTTP(S) ports.
Other protocols have their own ports, like SMTP for emails (\(465\), \(587\), or \(25\)) and LDAP(S) for auth (\(389\) or \(636\)). There’s a list of relevant protocols and applications with their standard ports in the cheat sheets in Appendix D.
Basic network administration
As you’ve probably gathered, there are many layers to networking which can make it difficult to manage. You might think you’ve configured things correctly, but the traffic just isn’t flowing and it’s not clear where the issue is. Here are some basic tools for network debugging.
Browser Devtools
One of the most useful tools for debugging networking issues can be found in the menus of your web browser. Your browser has developer tools that allow you to inspect the network traffic going out from your browser and coming back.
This can be really handy if a website is loading slowly or if you’re not sure why a page isn’t loading. By inspecting the status codes of different HTTP calls, the headers on those calls, and the time they take, you can develop a pretty good idea of where things might be getting stuck.
SSH Tunneling/Port Forwarding
When you start a new EC2 instance in AWS, the default security group has only port \(22\) open, allowing only SSH traffic. So far, you’ve seen SSH used to access the command line on that remote server, but SSH can actually be used to access any port in a process called tunneling or port forwarding.
When you tunnel, you make a port on the remote host available at the same port on \(\text{localhost}\) on your machine. The most common usage is to inspect an HTTP-based service in a browser without configuring the host to accept HTTP traffic on that port.
You can create an SSH tunnel to a remote host with:
Terminal
> ssh -L <remote port>:localhost:<local port> <user>@<server>I find that the syntax for port forwarding completely defies my memory and I need to google it every time I use it.6
So, for example, if your server were running at \(64.56.223.5\) and you have the SSH user test-user, you might forward JupyterHub on port \(8000\) with ssh -L 8000:localhost:8000 test-user@64.56.223.5. Once the tunnel was established, you could access JupyerHub in your browser on \(\text{localhost:8000}\).
Checking What Ports Are Open
Sometimes, you just forget what ports are open on your machine and for what purposes. Or, you want to double-check that a configuration change took. In that case, you want to use the netstat command to get the services that are running and their associated ports.
For this purpose, netstat is generally most useful with the -tlp flags to show ports that are open and the programs associated.
Checking if a Host Is Accessible
The ping command can be useful for checking whether your server is reachable at all. For example, the server where this book lives is at \(185.199.110.153\). So I can ping that domain to check if it’s accessible.
Terminal
> ping -o 185.199.110.153

PING 185.199.110.153 (185.199.110.153): 56 data bytes
64 bytes from 185.199.110.153: icmp_seq=0 ttl=58 time=23.3 ms

--- 185.199.110.153 ping statistics ---
1 packets transmitted, 1 packets received, 0.0% packet loss
round-trip min/avg/max/stddev = 23.322/23.322/23.322/nan ms
The -o flag tells ping to try just once as opposed to pinging continuously. The fact that I transmitted and received one packet means that everything is working properly.
Seeing an unreachable host or packet loss would indicate that my networking probably isn’t configured correctly somewhere between me and the server. That means it’s time to check that the server is actually up, followed by firewalls (security groups), and proxies. You can also use ping with a domain, so it can also be used to see if DNS is working properly.
If ping succeeds but a particular resource is inaccessible, it’s often helpful to try curl. curl actually attempts to fetch the website at a particular URL. For this purpose, the -I flag, which returns a simple status report rather than the full webpage, is useful.
For example, here’s what I get when I curl the website for this book.
Terminal
> curl -I https://do4ds.com

HTTP/2 200
server: GitHub.com
content-type: text/html; charset=utf-8
last-modified: Tue, 04 Jul 2023 16:23:38 GMT
access-control-allow-origin: *
etag: "64a4478a-79cb"
The important thing here is that first line. The server is returning a 200 HTTP status code, which means all is well. If you get something else, take a look at the http code cheat sheet in Appendix D.
If ping succeeds, but curl does not, it means that the server is up, but the path or port is incorrect. If you’re running inside a container, you should check that you’ve properly configured the port inside the container to be forwarded to the outside.
Comprehension questions
- What are the four components of a URL? What’s the significance of each?
- When you configure a service on a server, how do you get it on the right port?
- Draw a mind map of trying to access the following in your browser. Include the following terms: URL, domain, IP Address, port, path, \(80\), \(443\), \(8000\), proxy, server, HTTP, HTTPS, status code, protocol.
- A Shiny app on a server at \(\text{http://my-shiny.com}\) where Shiny Server is sitting on port \(80\).
- JupyterHub on a server at \(\text{https://example.com/jupyter}\) where JupyterHub is on port \(8000\).
Lab: Making it accessible in one place
In this lab, we’re going to set up a proxy to be able to access all of our services over HTTP.
But first, you might want to try out accessing the various services where they are.
You could either try SSH tunneling to them and seeing them on localhost or you could apply custom TCP rules to your security group to temporarily allow access directly to those ports. If you want to try, here’s a reminder of where everything is:
| Service | Port |
|---|---|
| JupyterHub | \(8000\) |
| RStudio | \(8787\) |
| Penguin model API | \(8080\) |
| Shiny App | \(3838\) |
Once you’re finished playing, make sure to change your security group rules back.
Step 1: Configure NGINX
Configuring proxies is an advanced networking topic. In most cases, you’d just put one service per server. But, if you want to be able to save money by running everything on one server, you’ll need a proxy.
Getting NGINX is straightforward: you install NGINX, put the configuration file into place, and restart the service to pick up the changes. The hard part is figuring out the right configuration. Configuring proxies can be quite painful as the configuration is very sensitive to seemingly meaningless syntax issues.
You can see working examples of the NGINX config and other files mentioned in this lab in the GitHub repo for this book (akgold/do4ds) in the _labs/lab12 directory.
Here are the steps to configure your proxy on your server for JupyterHub and RStudio Server:
- SSH into your server.
- Install NGINX with
sudo apt install nginx. - Save a backup of the default
nginx.conf,cp /etc/nginx/nginx.conf /etc/nginx/nginx-backup.conf.7 - Edit the NGINX configuration with
sudo vim /etc/nginx/nginx.conf. NGINX configuration is finicky. I recommend consulting my example in the GitHub repo. - Test that your configuration is valid
sudo nginx -t. - Start NGINX with
sudo systemctl start nginx. If you see nothing, all is well.
If you need to change anything, update the config and then restart with sudo systemctl restart nginx.
Step 2: Configure the security group
If you try to visit your server’s public IP address or DNS in your browser, your browser will spin for a while and nothing will happen. That’s because the AWS security group still only allows SSH access on port \(22\). We need to add a rule that will allow HTTP access on port \(80\).
On the AWS console page for your instance, find the Security section and click into the security group section. You want to add a new inbound HTTP rule that allows access on port \(80\) from anywhere. Make sure not to get rid of the rule that allows SSH access on \(22\). You still need that one too.
Once you do this, you should be able to visit your server address and get the default NGINX landing page.
Step 3: Configure the applications to match the networking
Complex web apps like RStudio and JupyterHub frequently proxy traffic back to themselves. For example, when you launch a Shiny app in RStudio, you’re just opening a “headless” browser window that gets proxied back into your session.
This works by default when those apps are on the root path \(\text{/}\). We’re running RStudio and JupyterHub on subpaths, so we’ve got to let the services know where they’re located.
Configuring RStudio Server is already done. The X-RStudio-Root-Path line in the NGINX configuration adds a header to each request coming through the proxy that tells RStudio Server that it’s on the \(\text{/rstudio}\) path.
JupyterHub needs a configuration update so it knows that it’s on a subpath. You can do this by setting the c.JupyterHub.bind_url attribute to be 'http://:8000/jupyter' in the /etc/jupyterhub/jupyterhub_config.py file and then restarting the JupyterHub service.
Step 4: Try it out!
Now we should have each service configured on a subpath. RStudio Server at \(\text{/rstudio}\), JupyterHub at \(\text{/jupyter}\). For example, with my server at \(\text{64.56.223.5}\), I can get to RStudio Server at \(\text{http://64.56.223.5/rstudio}\).
Right now this server is on HTTP, which is not a best practice. In fact, it’s such a bad practice that your browser will probably autocorrect the URL to https and you’ll have to manually correct it back to http and ignore some scary warnings. Don’t worry, we’ll fix this in Chapter 14.
Lab Extensions
If you’ve gone to the root URL for your server, you’ve probably noticed that it’s just the default NGINX landing page which is not very attractive. Consider creating and serving a static landing page at / with links to the other services. Or maybe you want one of the services at \(\text{/}\) and the others at a different subpath. You should have the tools to reconfigure NGINX to accomplish that.
Right now, neither the penguins model API nor the Shiny app is available from the outside. You might want to add them to the proxy to make them accessible. I’ll leave that as an exercise for you.
It’s very common to put an API and/or a Shiny app behind a proxy. Googling “Shiny app behind nginx” or “FastAPI with nginx” will yield good results.
One thing to consider is whether the model API should be publicly accessible. If the only thing calling it is the Shiny app, maybe it shouldn’t be.
URLs are a subset of a broader category called Uniform Resource Identifiers (URIs), which look like a URL and are used to identify a resource but may not be a valid address. I mention them only because you may run across them in certain contexts, like configuring SSO.↩︎
Different resources divide URLs into somewhere between three and seven parts. I think these four are the most useful for this chapter’s purpose.↩︎
The idea this works is quite elegant. Routers are arranged in a tree-like structure. Each router only keeps track of any downstream addresses and a single upstream default address. So the packet gets passed upstream until it hits a router that knows about the target IP address and then back downstream to the right place.↩︎
Ports are also used for outbound communication. Computers know how to automatically open ports for outbound communication and specify that’s where the response should come; we’re not going any further into the subject of outbound ports here.↩︎
Authors of server-based software choose their own default ports. They usually choose a relatively high number to make them unlikely to conflict with anything else.↩︎
As you might guess from this complicated syntax, you can do a lot more than this with SSH tunneling; this is what I use it for most frequently.↩︎
This is generally a good practice before you start messing with config files. Bad configuration is usually preferable to a service that can’t start at all because you’ve messed up the config so badly. It happens.↩︎